The mixing stage
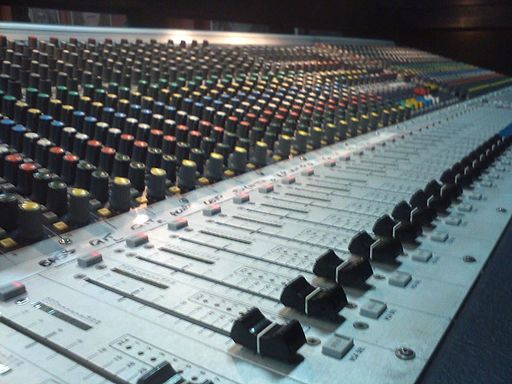
To be able to bring all of these instruments together, we’ll need a mixer. A professional mixing desk (often also called a console, interesting, right?), usually consists of a large number of so called channel strips which is where the individual instruments come in. For each channel strip, you can make a huge range of adjustments, of which we’ll be looking at a handful.
Volume control
This one’s easy. Different instruments come with different loudnesses. A bass drum is much louder than, say, a harp, just as a function of their physical attributes. The same is true for digitally created sounds. A bass sound that uses a high amount of filter resonance will be louder than other sounds, for example. But that’s only the first problem. The second problem is that you usually don’t want all sounds to have the same volume. A hihat often needs to be a lot quieter than other drum sounds, for example, because otherwise it would just sound wrong. To tackle that, each channel has a large control, usually called a fader, with which you can control the volume of that channel.
Code wise, or rather mathematically, this is just a simple multiplication. We could get fancy here and deal with the fact that volume usually works logarithmically and it would make sense to somehow scale the multiplication value.
Equalization
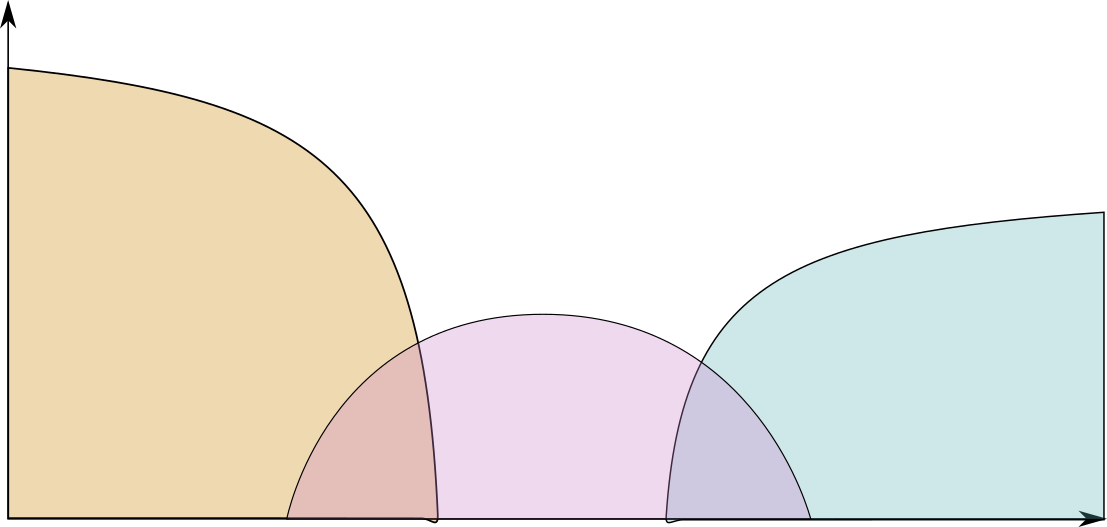
An important part of a mixing engineers work is to make sure the different instruments have enough space of their own in the frequency domain. This is a bit hard to explain with words, so let me show you an image that hopefully explains this a bit more. If too many instruments share a certain portion of the frequency spectrum, much as if you would paint with lots of different colors in one spot, the sound gets mushy, undefined and often just unpleasant, just as the picture you’re painting would turn brown-grey-gooey.
To help with that, an Equalizer, often shortened to EQ helps you to shape the frequency spectrum of a sound and thus makes it possible to, for each instrument, emphasize different parts of the spectrum, leading to a cleaner, more defined sound.
An EQ is essentially just a bunch of filters, in our case a lowpass and a highpass, that allow you to individually set the volumes for the different parts. With a low pass and a highpass, you can also set the volume of the mid section that’s not affected by the filters directly.
Compression
Compression in this case does not mean data compression. Instead, a compressor changes the dynamic range of a instrument, meaning the difference between quiet and loud sounds. There are many reasons why you would want to do this, but the main reason is that using moderate amounts of compression makes a track sounding more loud.
Compression works by (more or less) making louder sounds more quiet. For that, the compressor uses a curve like this.
Additionally, a compressor usually has a way to change the attack and decay times, meaning the the loudness reduction does not happen instantly but is fading in after the loudness reaches a certain threshold and if the sound gets quieter again, the compressor takes a while to dial back the signal reduction. This makes it possible to use a compressor not only for actually compressing the dynamic range but also shaping so-called transients, like the attack of a kick drum. If you use a slightly longer attack on the compressor, the signal is not compressed for that time and only ducked down after it, so that the attack of the drum becomes even more pronounced.
There’s a very popular effect specifically in modern dance music that can also be done with the help of a compressor, which is nowadays often abbreviated as “sidechaining” which is weird, because you can sidechain all kinds of effects but if this word is used in isolation, you’re probably talking about sidechain compression.
Sidechaining means that instead of letting the actual input signal of the compressor drive the compressor algorhythm, you let it be driven by a different signal, typically a simple kick drum rhythm. Each time the kick drum plays, the compressor kicks into gear and ducks down your original signal.
In our machinery, the “sidechaining” is actuallly gonna be done slightly different by triggering a simple envelope each time the kick drum is played. It is easier to parameterize and more consistent and in a lot of productions, the sidechaining effect is actually done in a similar way now.
Insert effects
On a hardware mixer, the number of insert effects per channel is usually limited, as you need a way to actually physically connect these effects. In software, the limit is usually CPU power. As we’re not really striving for realtime performance, we’re more or less only limited by the amount of time we want to spend on processing.
We can essentially insert any form of processing here we have in mind. For our small example, we’re going to stick with two effects for now.
The first one is a very simple effect, a so called waveshaper. The function of a waveshaper is really hard to describe in words, which is why a picture is in order: The x axis is the input value and the y axis is the output value.
A generalized waveshaper would allow you to specify any transformation curve you want, in our case, we’re simply using a function with a parameter which allows us to specify the amount of distortion we want to apply. The formula is dead simple:
def simple_waveshaper(input, a)
  input * (input.abs + a) / (input ** 2 + (a - 1) * input.abs + 1)
end
We’re going to use the waveshaper in a rather subtle way on the kick drum as this will give our synthesized kick drum a little bit more punch.
The second effect we’re going to take a look at is a chorus effect. The idea behind the chorus effect (hence the name) is to simulate the effect of multiple voices “singing” together. The reason a choir sounds so powerful is actually the tiny little imperfections in the voicing which lead to interferences between different voices. This makes the choir sound “fatter” in the lack of a better term.
the way a chorus achieves this is by running half of the signal through a tiny delay and then slightly modulating the delay time. Especially with synth lines, this does make the result sound a lot fatter.
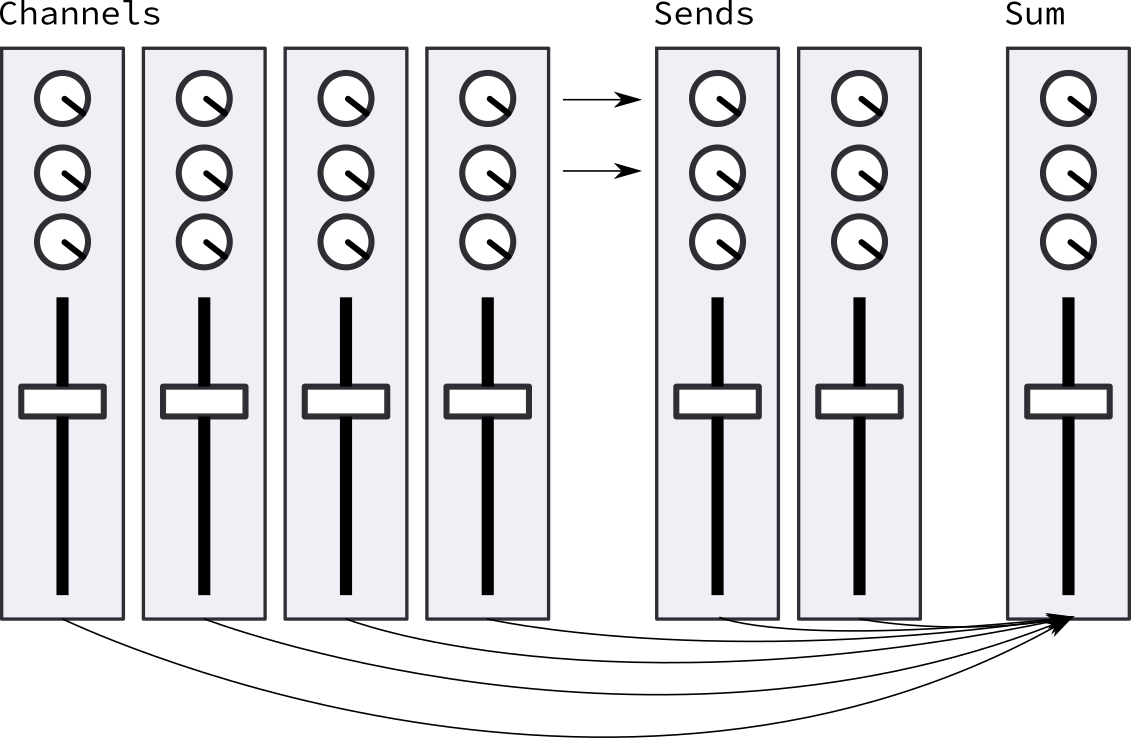
Send effects
Send effects send a portion of the channel strip signal to another channel that is specialized in a specific effect. Two things very often used as send effects are Reverb and Delay, both effects to create the illusion of space. Since you probably, for consistency reasons, want these to sound similar for every channel, it makes sense to simply instantiate them once and then use from every channel.
Delay
A delay, in it’s simplest form from a code perspective is just a ring buffer, where the length of the buffer is equal to the desired delay time. What you probably need to add to that to get to the specific echo sound is adding some feedback where the output signal is mixed back into the input, thus creating these recurring echoes that get quieter and quiter as time progresses. If you want to get fancy, you can add a filter to that feedback, shaping the frequency spectrum of the feedback loop.
Here’s my very simple delay class:
class Delay
  # time is given in seconds
  def initialize(sample_rate, time)
    @buffer = Array.new((sample_rate.to_f * time).floor)
    @pointer = 0
  end

  # input value, mix (0 = no delay, 1 = only delay),
  # feedback (0 = zero feedback, 1 = full feedback (not advised))
  # you can supply an additional block to filter the delay signal, for example
  # with Eq. parameter is the delay signal value,
  # block needs to return the filtered signal value
  def run(input, mix, feedback = 0.4)
    old_pointer = @pointer
    @pointer = (@pointer + 1) % @buffer.length
    delayed = (@buffer[@pointer] || 0.0)
    if block_given?
      delayed = yield delayed
    end
    @buffer[old_pointer] = input + (feedback * delayed)
    input * (1.0 - mix) + delayed * mix
  end
end
Reverb
A reverb is essentially trying to simulate the response a room gives if you make some sound in it. It could be a small room or it could be a cathedral. The reverberation in a real room is created by the sound bouncing off the walls in all kinds of fuzzy ways. Essentially what you have is a huge collection of tiny echoes all adding up and crossfeeding, returning back a muddy but also really really pleasant (usually) version of the original sound. Also: The bigger the room, the longer the reverb.
To emulate this in software we essentially have two choices: Using actual reverb data from real places with a technique called convolution or trying to get as close as possible to the real thing with a combination of echoes and filters.
Convolution reverb works by recording a so called impulse response from an actual room. You would do that by creating an impulse, a very sharp, quick sound and playing it back very loudly and then recording the response of the room. If you are then able to subtract the original impulse from that response, you’re left with the actual impulse response you can use for the convolution.
The idea of convolution is simple: For each sample, simply multiply it with each sample of the impulse response. But you can also see how this quickly falls apart: This is a very compute intensive operation. By using a bunch of tricks we can make it more viable and for example the Web Audio API actually has a convolver node that can do this without heavily taxing the CPU, but it also comes with the additional burden of you having to keep these impulse responses around.
For a long time, using convolving wasn’t even an option, because computing power wasn’t as readily available as it is today, which is why a lot of techniques exist to create reverb effects with simpler measures.
Usually it involves creating a bunch of delay lines with random placement within the desired reverb time and then using various techniques to muddle things up. I’ve ported a popular open source reverb, which is also used in SonicPi, GVerb, to ruby, which you can find in lib/g_verb.rb if you’re interested in the details.
The main mix
The main mix channel simply gives you the possibiliy to adjust the final volume again, so that the output signal is in a good range and you probably have a sum compressor on it as well, to further reduce the dynamic range. For safety we’ll also add a hard limiter, which, by brute force, just makes sure the end result never leaves the -1 … 1 range.